All previous examples have one disadvantage. You cannot have different font style and size for each line of text. If you really want complex button like that, here is solution I made. I like how it's nice to use RelativeLayout to define complex layouts, and I decided to try to create Button which layout can be defined with RelativeLayout.
I tried to make solution simple and easy to use. Here is the result, give it try.
Full source code can be downloaded here: RelativeLayoutButton.zip
Creating button layout using RelativeLayout
First what you need is to create new Android XML RelativeLayout file. It will served as a template for our Button.
Here is example of button layout which consists of one ImageVew and two TextView controls:
test_button.xml
<xml version="1.0" encoding="utf-8"?>
<RelativeLayout
android:layout_height="wrap_content" android:layout_width="wrap_content">
<ImageView
android:id="@+id/test_button_image">
android:layout_width="wrap_content"
android:src="@drawable/icon"
android:layout_height="wrap_content"
android:layout_alignParentTop="true"
ImageView>
<TextView
android:id="@+id/test_button_text2"
android:layout_width="wrap_content"
android:layout_height="wrap_content"
android:textSize="20sp"
android:layout_alignTop="@+id/test_button_image"
android:layout_toRightOf="@+id/test_button_image"
android:text="Relative layout">
TextView>
<TextView
android:id="@+id/test_button_text1"
android:layout_width="wrap_content"
android:text="Compound button"
android:layout_height="wrap_content"
android:layout_below="@+id/test_button_text2"
android:layout_alignLeft="@+id/test_button_text2">
TextView>
RelativeLayout>
Here is the graphical result of test_button.xml:

Using test_button.xml layout in other layouts
To reuse button layout in other XML layouts simply use include tag in other layouts. There are two important attributes of include tag: layout and android:id Layout attribute represents name of layout to include, while android:id represents Id which will be used to access button in our code.
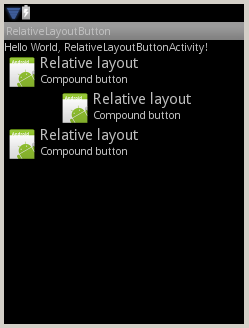
Here is example of main.xml layout which consists of three buttons. Also notice that every include tag have different layout attributes. They define Buttons position in parent view.
main.xml
xml version="1.0" encoding="utf-8"?>
android:orientation="vertical"
android:layout_width="fill_parent"
android:layout_height="fill_parent"
>
<TextView
android:layout_width="fill_parent"
android:layout_height="wrap_content"
android:text="@string/hello"
/>
<include android:id="@+id/button1"
layout="@layout/test_button"
android:layout_width="fill_parent"
android:layout_height="wrap_content">
include>
<include android:id="@+id/button2"
layout="@layout/test_button"
android:layout_height="wrap_content"
android:layout_width="wrap_content"
android:layout_gravity="center">
include>
<include android:id="@+id/button3"
layout="@layout/test_button"
android:layout_height="wrap_content"
android:layout_width="wrap_content">
include>
LinearLayout>
Here is graphical representation of main.xml:
RelativeLayouButton class
Here is the source code of RelativeLayoutButton class. Constructor accept context and id of RelativeLayout which will serve as template for our button. Comments are in code:
package relativelayoutbutton.android.izvornikod.com;
import android.app.Activity;
import android.content.Context;
import android.graphics.drawable.Drawable;
import android.view.View;
import android.view.ViewGroup;
import android.widget.Button;
import android.widget.ImageView;
import android.widget.RelativeLayout;
import android.widget.TextView;
public class RelativeLayoutButton extends RelativeLayout {
public RelativeLayoutButton(Context context, int id)
{
super(context);
// if our context is not Activity we can't get View supplied by id
if (!(context instanceof Activity))
return;
// find relative layout by id
View v = ((Activity)context).findViewById(id);
// is it RelativeLayout ?
if (!(v instanceof RelativeLayout))
return;
//cast it to relative layout
RelativeLayout layout = (RelativeLayout)v;
// copy layout parameters
ViewGroup.LayoutParams params = layout.getLayoutParams();
this.setLayoutParams(params);
// here I am using temporary instance of Button class
// to get standard button background and to get button text color
Button bt = new Button(context);
this.setBackgroundDrawable(bt.getBackground());
// copy all child from relative layout to this button
while (layout.getChildCount() > 0)
{
View vchild = layout.getChildAt(0);
layout.removeViewAt(0);
this.addView(vchild);
// if child is textView set its color to standard buttong text colors
// using temporary instance of Button class
if (vchild instanceof TextView )
{
((TextView)vchild).setTextColor(bt.getTextColors());
}
// just to be sure that child views can't be clicked and focused
vchild.setClickable(false);
vchild.setFocusable(false);
vchild.setFocusableInTouchMode(false);
}
// remove all view from layout (maybe it's not necessary)
layout.removeAllViews();
// set that this button is clickable, focusable, ...
this.setClickable(true);
this.setFocusable(true);
this.setFocusableInTouchMode(false);
// replace relative layout in parent with this one modified to looks like button
ViewGroup vp = (ViewGroup)layout.getParent();
int index = vp.indexOfChild(layout);
vp.removeView(layout);
vp.addView(this,index);
this.setId(id);
}
// method for setting texts for the text views
public void setText(int id, CharSequence text)
{
View v = findViewById(id);
if (null != v && v instanceof TextView)
{
((TextView)v).setText(text);
}
}
// method for setting drawable for the images
public void setImageDrawable(int id, Drawable drawable)
{
View v = findViewById(id);
if (null != v && v instanceof ImageView)
{
((ImageView)v).setImageDrawable(drawable);
}
}
// method for setting images by resource id
public void setImageResource(int id, int image_resource_id)
{
View v = findViewById(id);
if (null != v && v instanceof ImageView)
{
((ImageView)v).setImageResource(image_resource_id);
}
}
}
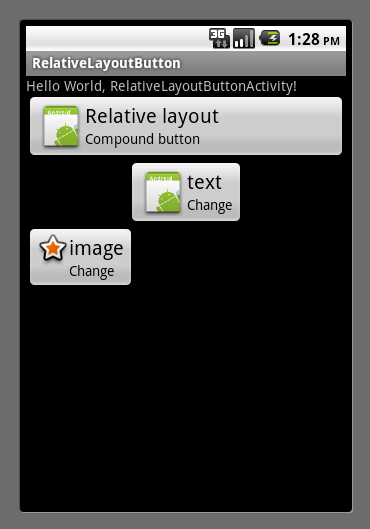
To use button in the code you first must create instance of the RelativeLayoutButton. Instance must be created in Activity class, usually in onCreate method. After that you can attach event handlers to it and modify text and images on the button using methods of RelativeLayoutButton class.
Here is example of using RelativeLayoutButton :
package relativelayoutbutton.android.izvornikod.com;
import android.app.Activity;
import android.os.Bundle;
import android.view.View;
import android.view.View.OnClickListener;
import android.widget.RelativeLayout;
import android.widget.Toast;
public class RelativeLayoutButtonActivity extends Activity {
/** Called when the activity is first created. */
@Override
public void onCreate(Bundle savedInstanceState) {
super.onCreate(savedInstanceState);
setContentView(R.layout.main);
RelativeLayoutButton button1 = new RelativeLayoutButton(this,R.id.button1);
button1.setOnClickListener( new OnClickListener() {
@Override
public void onClick(View v) {
Toast.makeText(RelativeLayoutButtonActivity.this, "RelativeLayoutButton clicked", Toast.LENGTH_LONG).show();
}
});
RelativeLayoutButton button2 = new RelativeLayoutButton(this,R.id.button2);
button2.setText(R.id.test_button_text1, "Change");
button2.setText(R.id.test_button_text2, "text");
RelativeLayoutButton button3 = new RelativeLayoutButton(this,R.id.button3);
button3.setText(R.id.test_button_text1, "Change");
button3.setText(R.id.test_button_text2, "image");
button3.setImageResource(R.id.test_button_image, android.R.drawable.star_big_on);
}
}
Started activity look like on the image below.
Full source code can be downloaded here: RelativeLayoutButton.zip
Feel free to leave comments.